1. About this guide
GlacierPoint Ledger reads the licenses and seats of a Microsoft 365 tenant and prices what is unused: licenses bought and not assigned, licensed accounts nobody uses, users who pay twice for the same service, guests and shared mailboxes holding licenses, assignment errors and subscriptions about to end. It only reads; nothing in the tenant is ever changed. It has two parts:
- The Windows app runs on a computer of yours. It signs in to Microsoft as you, reads the tenant, seals what it read on that computer and uploads it. It never sees a price.
- The portal, in your browser, holds your workspace: your team, your tenants and every run. It runs the eleven checks, prices them, and shows the report, the lists behind each figure, the CSV files and the PDF. It never signs in to your tenant.
This guide is for the administrator who looks after one or more tenants, for an organization of their own or for customers. It follows the order in which you meet things: install and connect, sign in, run, read the report, then the parts you set up once.
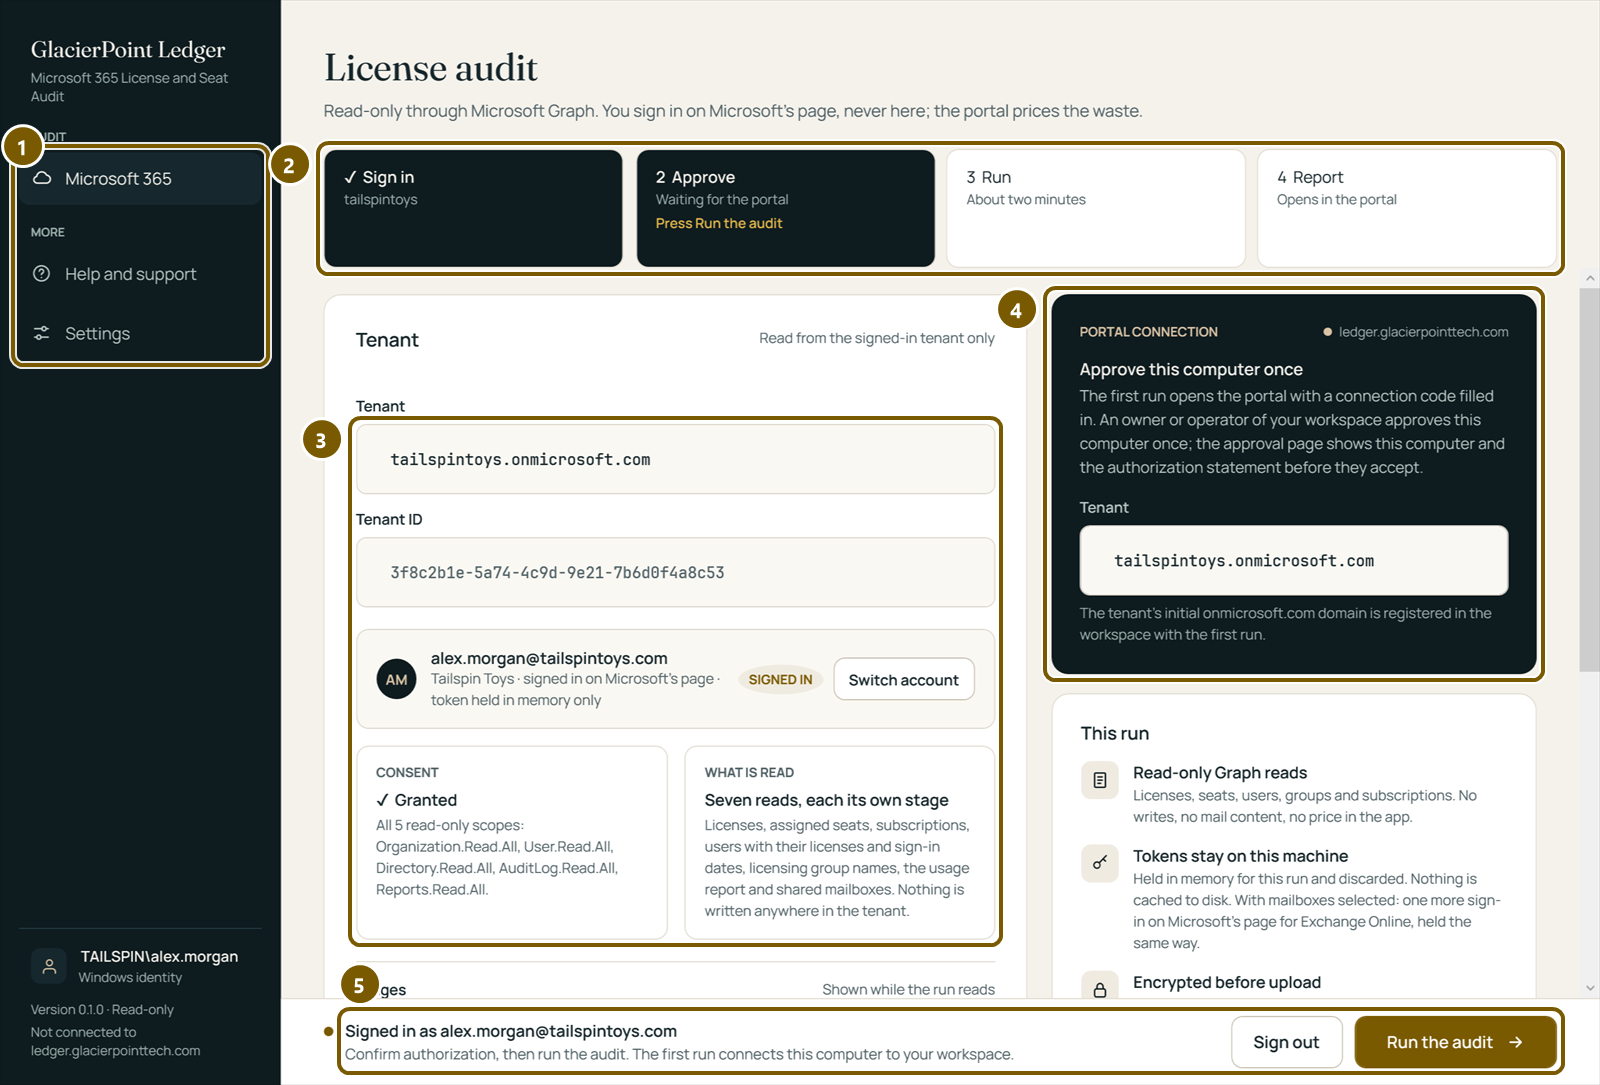
- 1The menu: Microsoft 365 (the audit), Help and support and Settings. Its foot shows your Windows account, the app version and the portal the app is connected to.
- 2The four steps of a run: Sign in, Approve, Run, Report. The steps that are done or under way are dark; the line in color says what to do next.
- 3The tenant you signed in to, its ID, the account and what the app may read (the Consent card).
- 4The connection to the portal: approved once per computer, the first time you run.
- 5The footer: what is happening now, Sign out, and Run the audit.
Light or dark. The website and the portal follow the setting of your computer until you use the switch with a sun and a moon at the top of a page; your browser remembers the choice. The app has the same choice under Settings, Appearance. The pictures in this guide show the light colors.
The app and this guide use the same words. A run is one reading of one tenant at one moment. A check is one of the eleven questions the portal asks of a run, such as "licenses bought and not assigned". A SKU is one license product, such as Microsoft 365 E3.
2. Install and connect the Windows app
What you need
- A workspace in the portal. Start free creates one with your work email; colleagues are invited later, in Settings.
- A Windows 10 or Windows 11 computer, 64-bit.
- An account of the tenant that can read the directory. Global Reader is enough; the app asks for read permissions only.
Download the app
Sign in to the portal. The card Connect the Windows app is on the Tenants page, the first page you see.
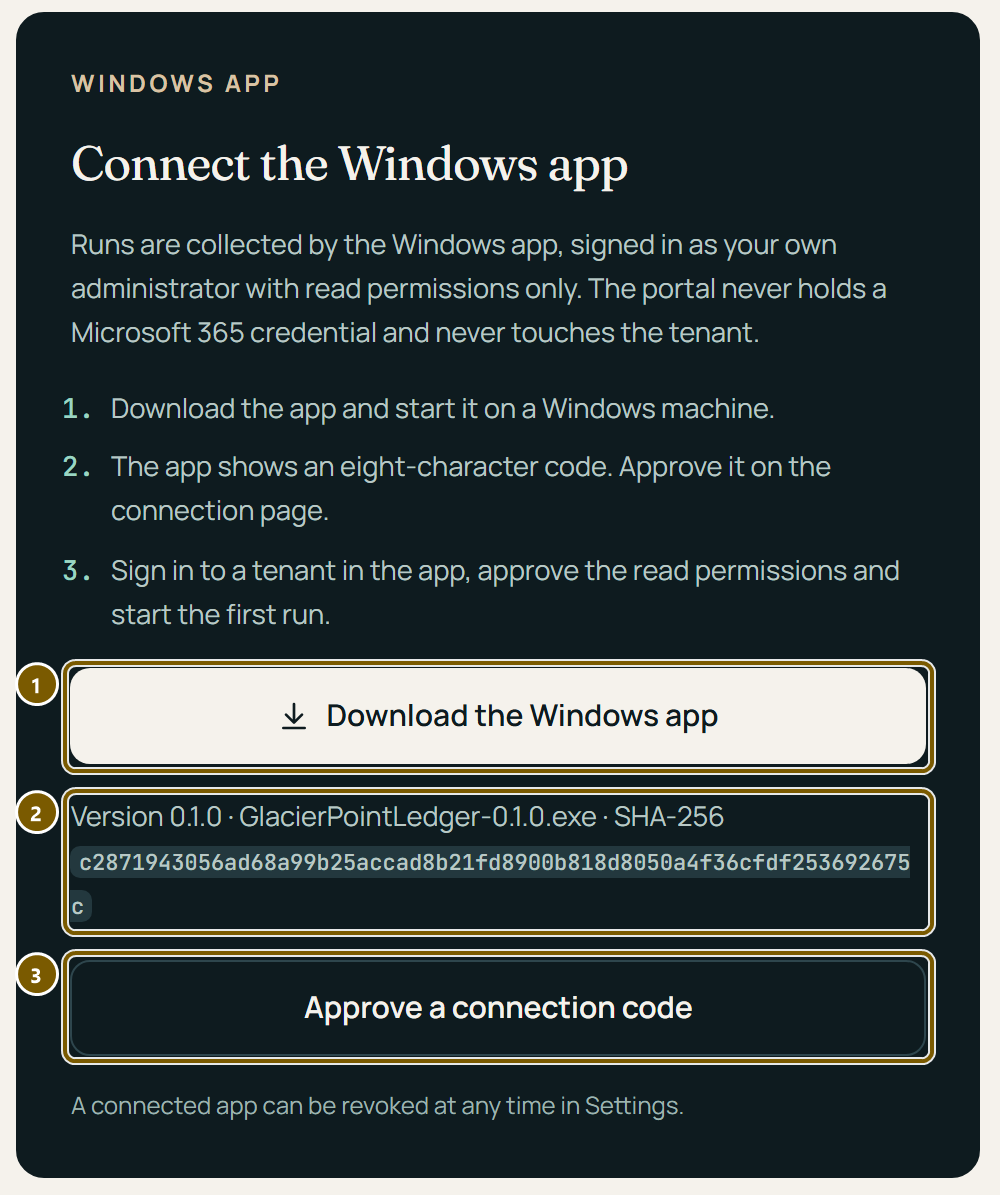
- 1Download the Windows app saves
GlacierPointLedger-0.1.0.exe. It is a single program; there is nothing else to install. Start it. - 2The version, the file name and its SHA-256 checksum, to compare with
Get-FileHashif you want to be sure the file is the one the portal offers. The Download page shows the same. - 3Approve a connection code opens the page where you approve the app (below).
Connect the app to your workspace
Connecting is done once per computer, the first time you press Run the audit (section 4). The app asks the portal for an eight-character code, copies it to the clipboard and opens the portal's Connect an app page in your browser with the code filled in.
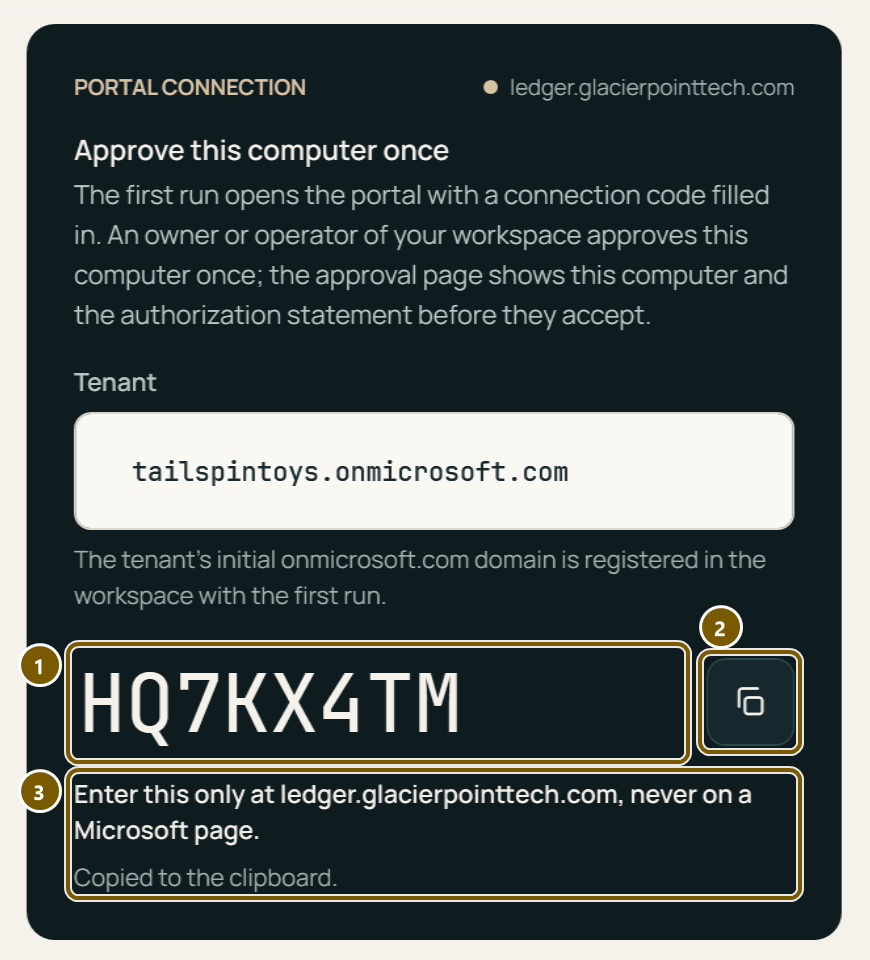
- 1The connection code.
- 2Copies the code again, if you need to type it in the portal yourself.
- 3Enter the code only on the portal, never on a Microsoft page. The app says when it has copied the code.
In the portal, sign in if asked. Only an owner or an operator of the workspace can approve.
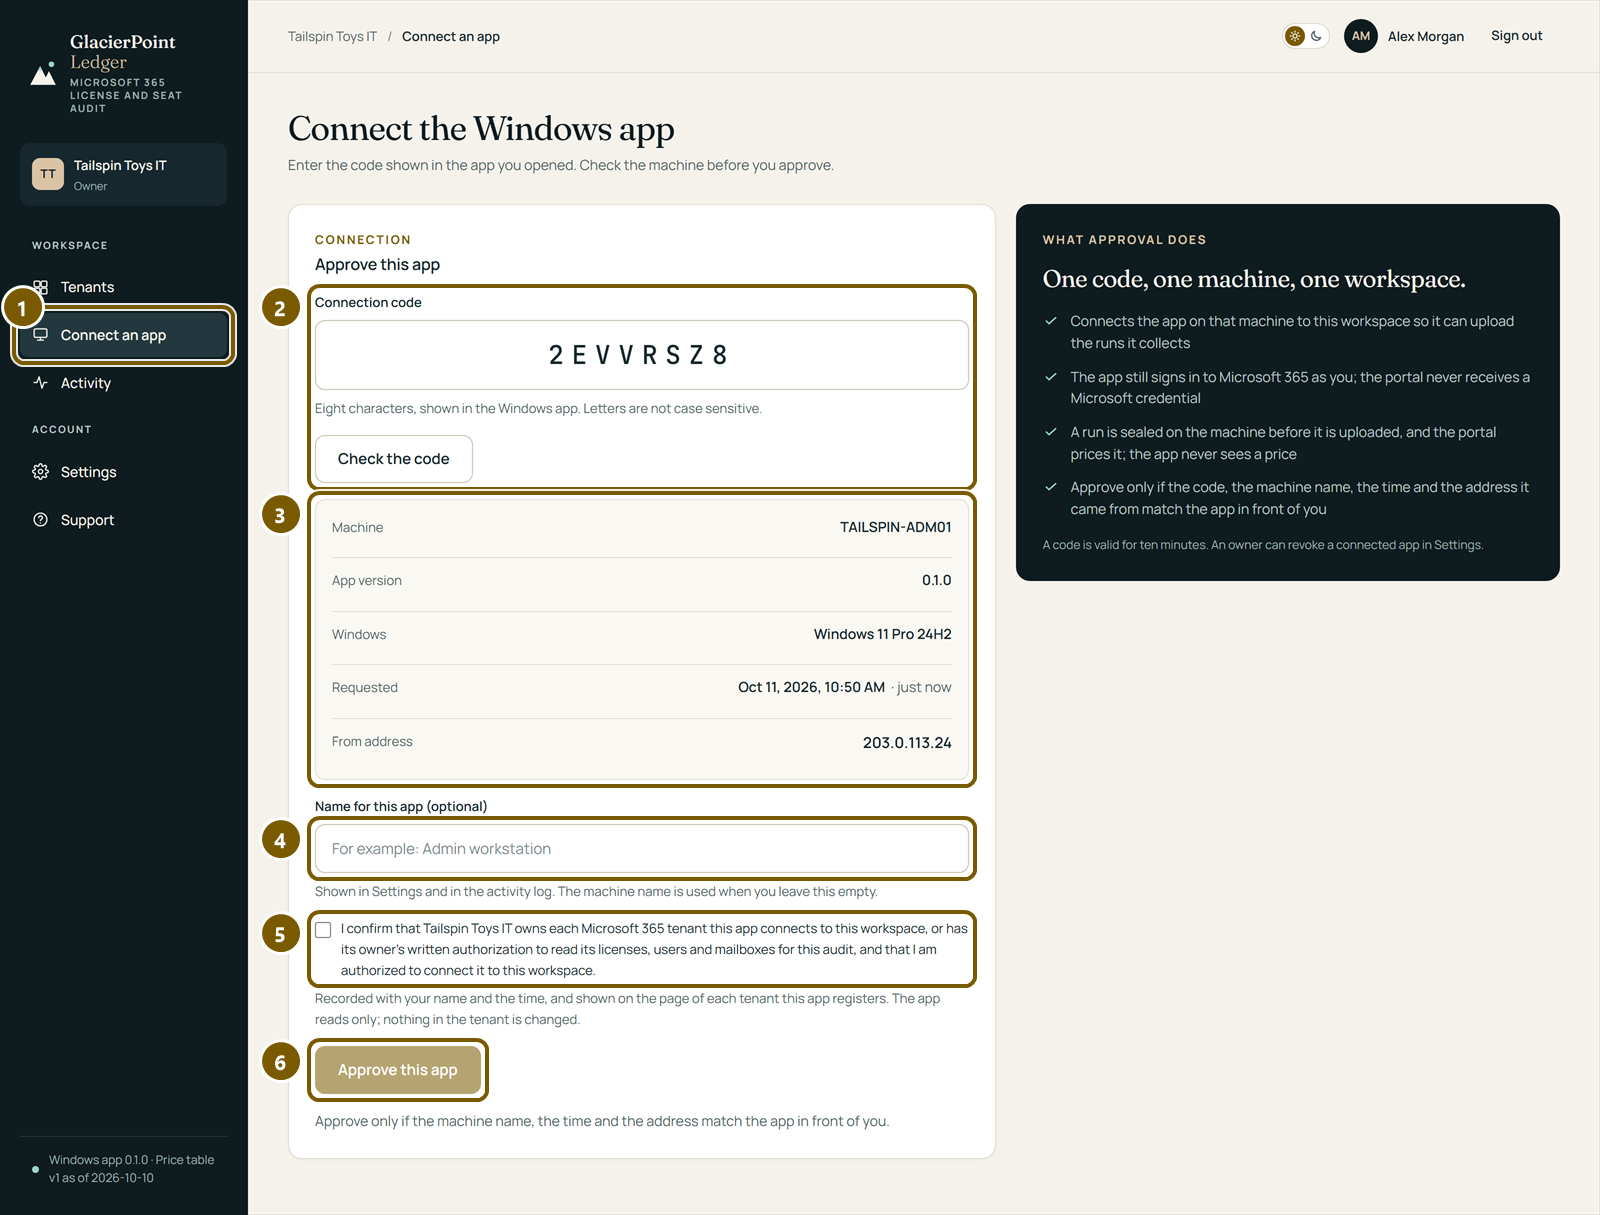
- 1Connect an app in the portal's menu opens this page at any time.
- 2The code from the app. Type it and choose Check the code if the page did not open with it.
- 3The computer that asked: its name, the app version, Windows, when and from which address. Approve only when they are the computer in front of you.
- 4A name for the app, such as "Admin workstation", shown in Settings and in the activity log. Leave it empty to use the machine name.
- 5The authorization statement: your organization owns each tenant this app connects, or has its owner's written authorization to read it, and you may connect it. It is recorded with your name and the time and shown on the page of each tenant the app registers.
- 6Approve this app becomes available once the statement is ticked. Within a few seconds the app shows that it is connected and the run goes on.
An owner can revoke a connected app at any time in the portal's Settings, under Connected apps.
The Terms of Service
When the portal has a version of the Terms of Service in force, the app shows it before its first connection to that portal, and again when a new version comes into force.
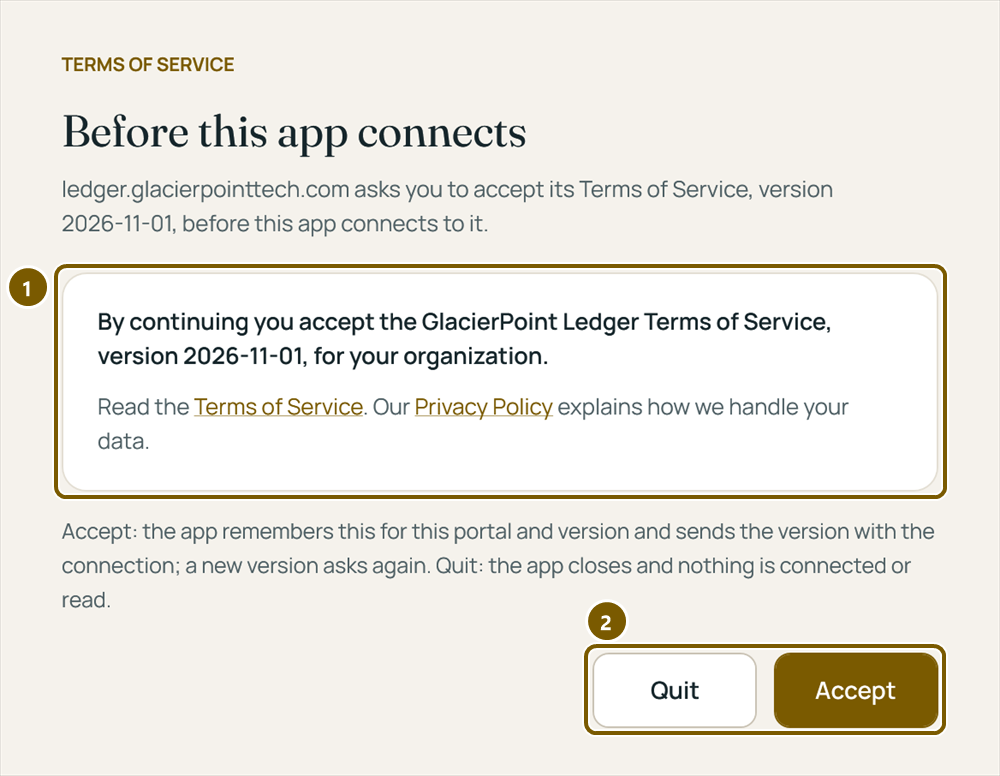
- 1What you accept, for your organization, and the version. The links open the Terms of Service and the Privacy Policy on the website.
- 2Accept remembers the version for this portal and sends it with the connection. Quit closes the app; nothing is connected or read.
3. Sign in and grant the read permissions
The app signs in on Microsoft's own page in your browser. No password is typed in the app; the sign-in is held in memory for the run and discarded when it ends.
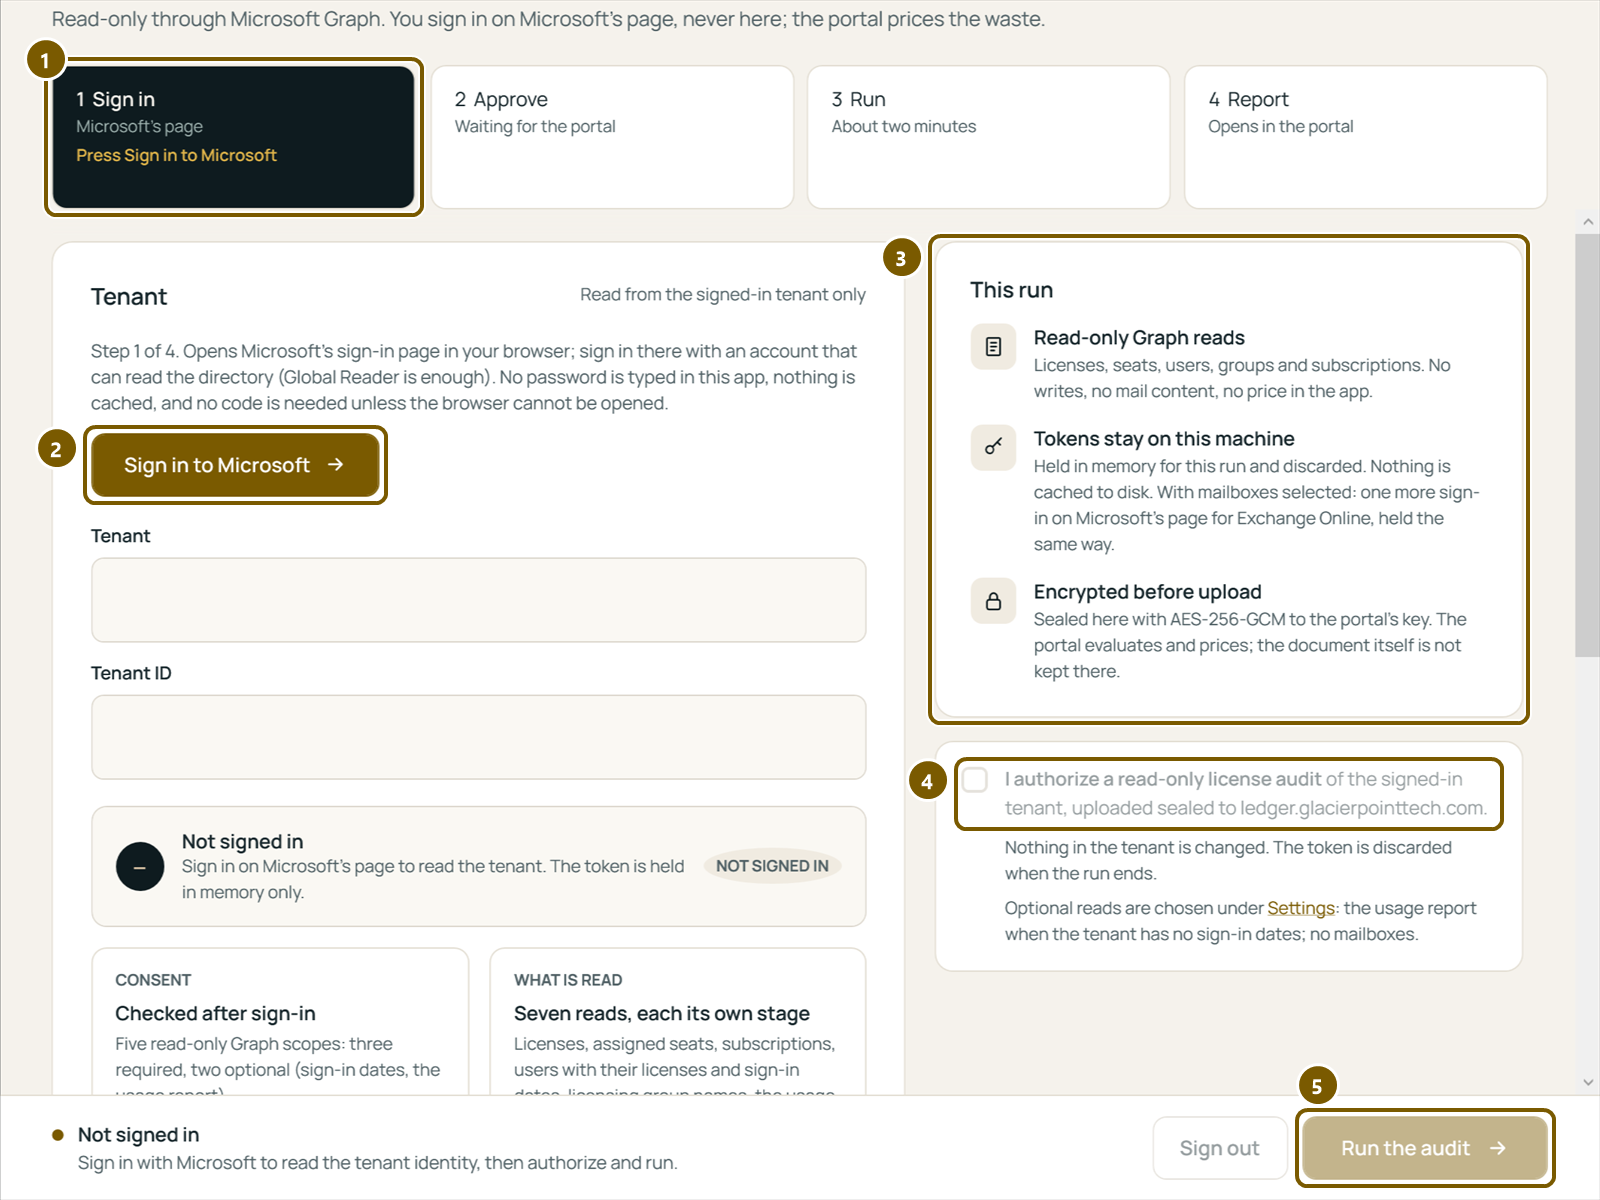
- 1Step 1 of 4, with what to do next.
- 2Sign in to Microsoft opens Microsoft's sign-in page. Sign in there with an administrator account of the tenant. Microsoft's page names the app the sign-in is for; that is expected.
- 3This run: read-only Graph reads, tokens that stay on this computer, and a run that is encrypted before it is uploaded.
- 4The authorization box. After the sign-in it names the tenant: tick it to confirm that you may audit that tenant, read-only.
- 5Run the audit becomes available once you are signed in and the box is ticked.
The read permissions
The app asks for five read-only Microsoft Graph permissions. Three are required: Organization.Read.All (subscriptions and SKUs), User.Read.All (users and their licenses) and Directory.Read.All (licensing groups and assignment states). Two are optional: AuditLog.Read.All gives the last sign-in dates, and Reports.Read.All the Microsoft 365 usage report. The Consent card says which are granted.
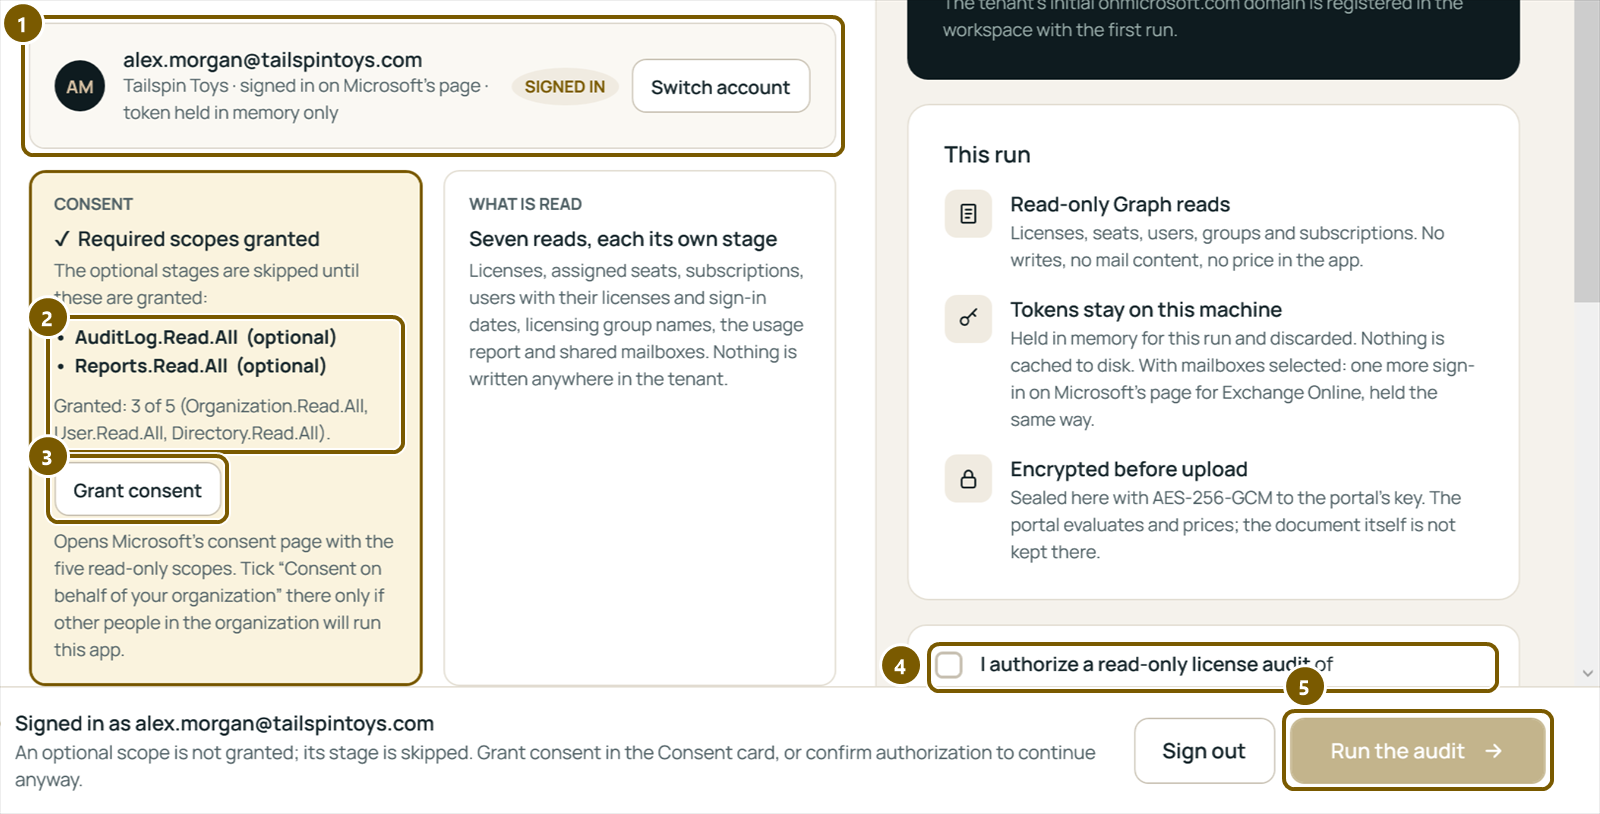
- 1The account you signed in with and its organization. Check that it is the tenant you meant; Switch account signs in again with another.
- 2The permissions that are missing and the ones that are granted. A stage that needs a missing optional permission is skipped, and the report says so.
- 3Grant consent opens Microsoft's consent page with the five read-only permissions. Tick "Consent on behalf of your organization" there only if other people in the organization will run the app.
- 4Tick the authorization box to go on with the permissions you have.
- 5Run the audit starts the run.
4. Run the audit
A run reads the tenant and changes nothing in it. It takes about two minutes for most tenants. The app reads in seven stages, one after the other, and shows each as it goes.
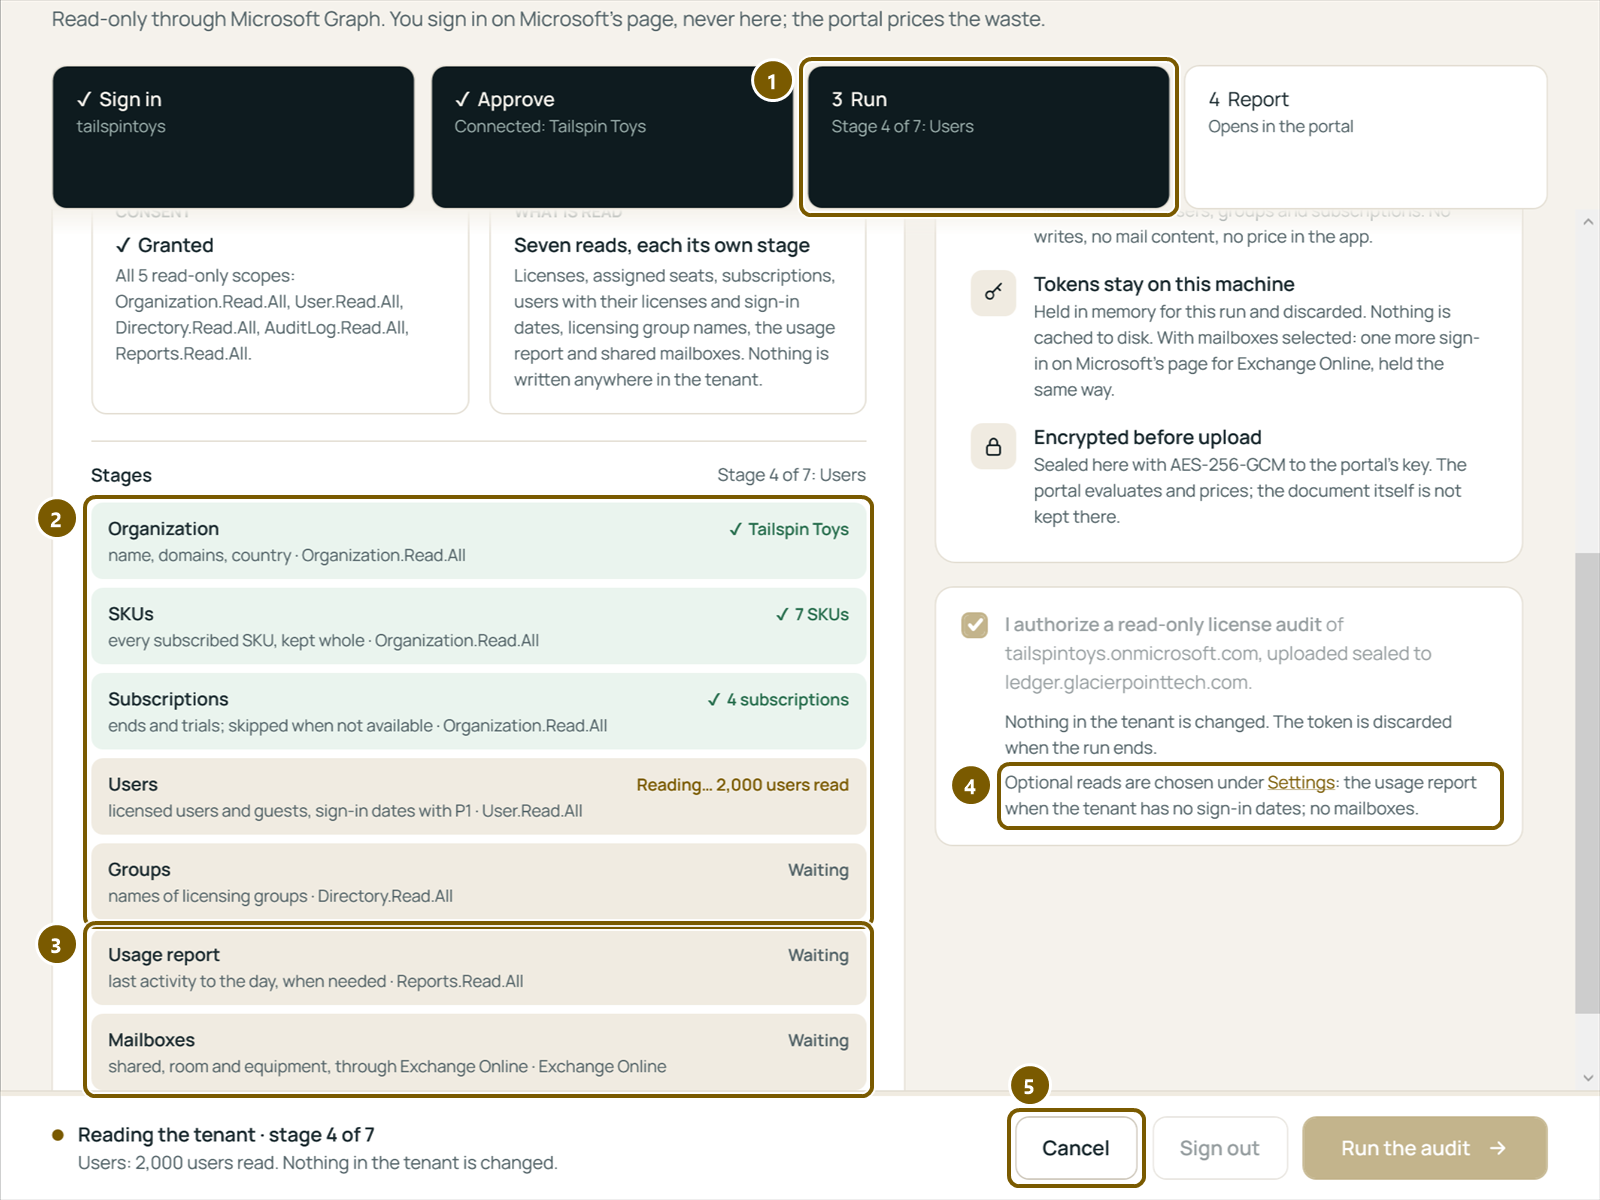
- 1The stage under way.
- 2The stages every run reads: the organization, the subscribed SKUs, the subscriptions, the users and guests with their licenses (and their sign-in dates when the tenant has Entra ID P1 or P2), and the names of licensing groups. Each says what it read.
- 3The two optional stages. The usage report gives the last activity of each user, to the day, across Exchange, OneDrive, SharePoint and Teams. The mailboxes stage reads the shared, room and equipment mailboxes through Exchange Online: sizes and holds only, never mail.
- 4Which optional reads this run makes, and where to change them.
- 5Cancel stops the run; nothing is uploaded.
The usage report and the mailboxes
The optional reads are chosen in the app's Settings, under What a run reads.
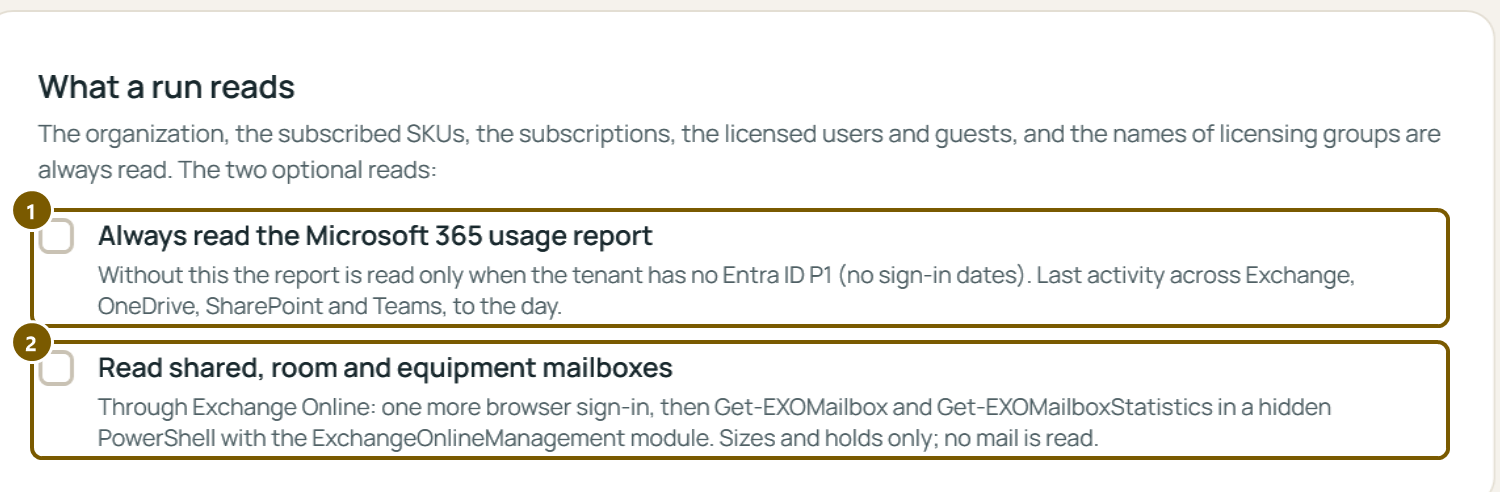
- 1Always read the Microsoft 365 usage report. Without it, the report is read only when the tenant has no Entra ID P1, so has no sign-in dates (section 5, "The P1 note").
- 2Read shared, room and equipment mailboxes. One more sign-in on Microsoft's page, for Exchange Online, held in memory like the first.
When the run is done
The app seals what it read on your computer, uploads it to your workspace and opens the run's page in your browser.
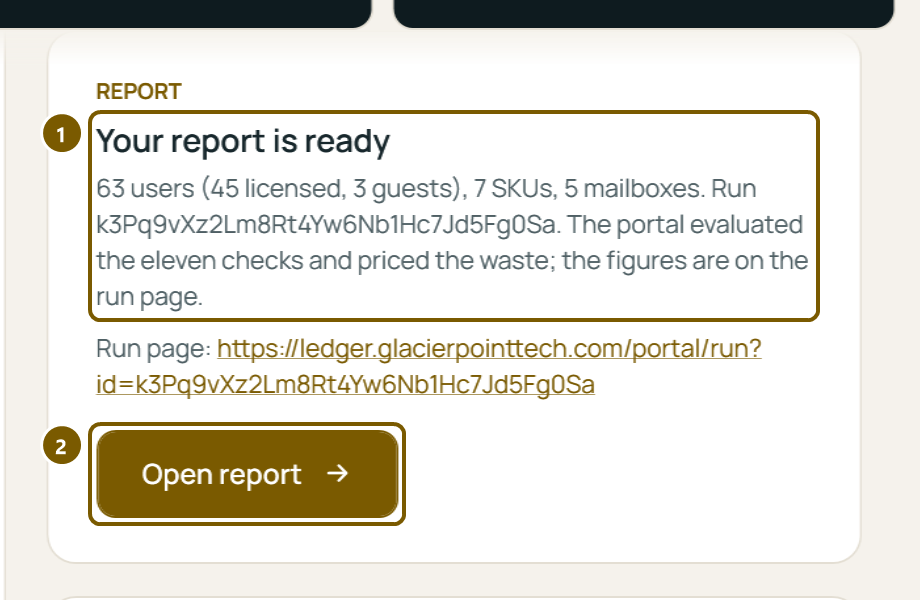
- 1The run is in the portal. The sign-in was discarded; another run signs in again.
- 2Opens the run's page again, if you closed it.
5. Read the report
In the portal, open Tenants and choose a tenant. Its page shows the newest run; a list at the top opens an older one.
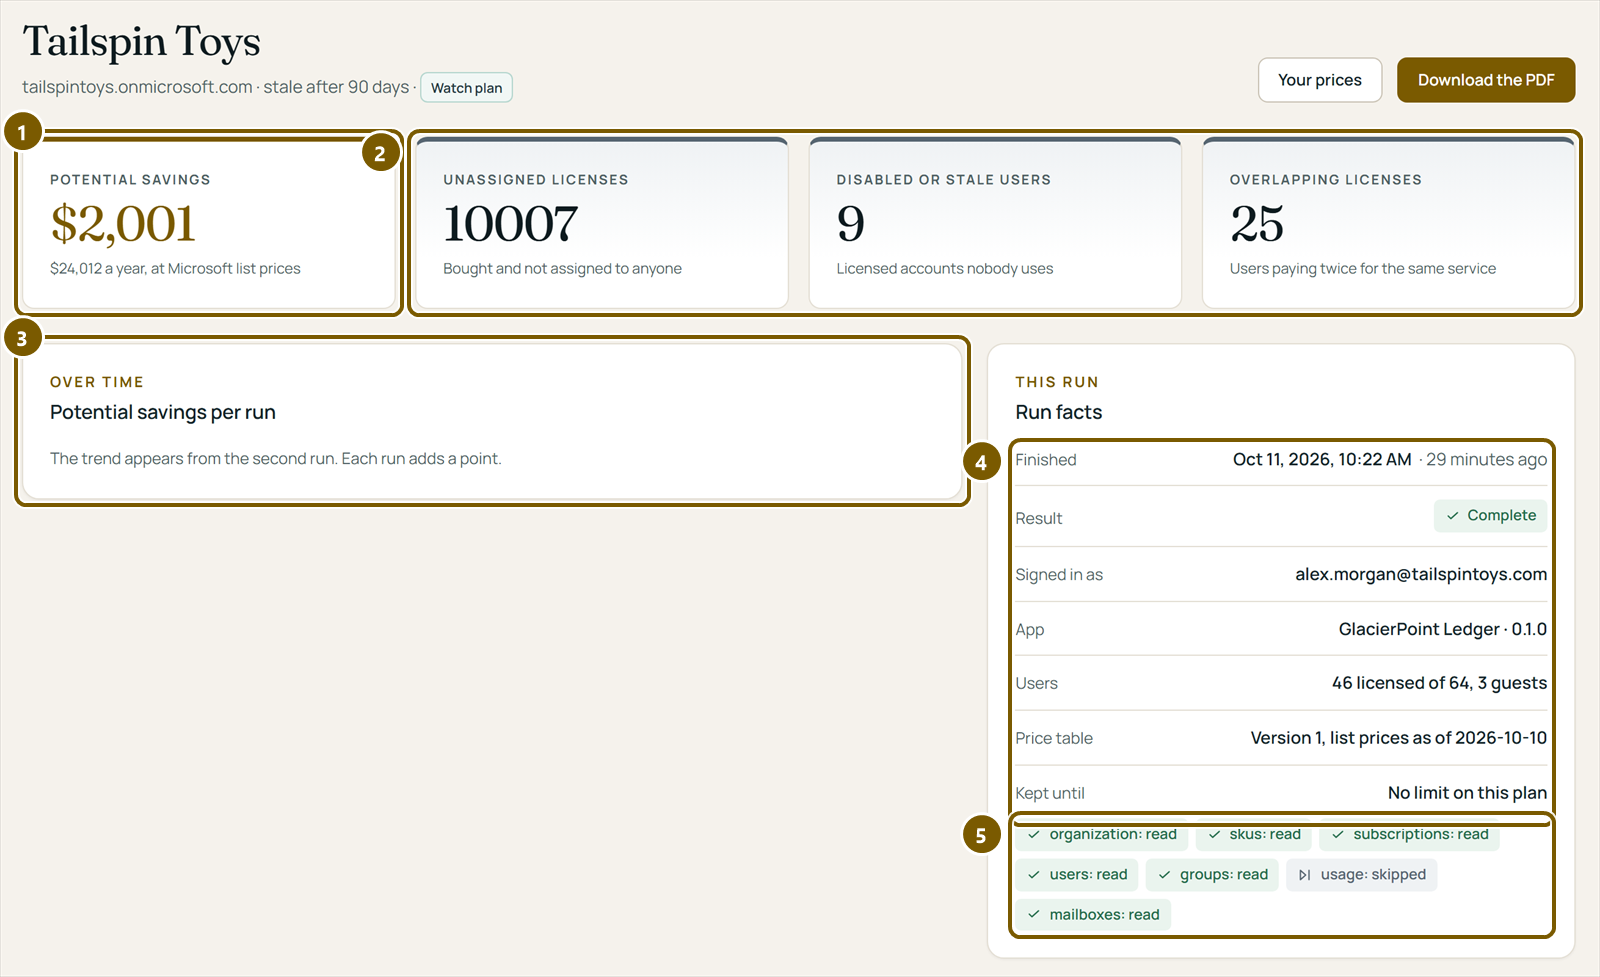
- 1Potential savings: what the unused and doubled licenses cost a month, and a year, at the prices of this run. A license that falls under several checks is counted once.
- 2The three headline counts: licenses bought and not assigned, licensed accounts nobody uses (disabled or stale), and users paying twice for the same service.
- 3Over time: the potential savings of each run, from the second run on.
- 4Run facts: when it finished, the result, the account, the app, how many users, the price table and how long the run is kept.
- 5What each stage read. Skipped means a stage was not needed or not chosen, and the checks that depend on it say so.
The checks
Below the card, each check has a section: unassigned licenses, disabled users still licensed, stale users, users who never signed in, overlapping licenses, add-ons without a base license, guests with licenses, shared, room and equipment mailboxes with licenses, license assignment errors, service plans turned off, and subscriptions ending.
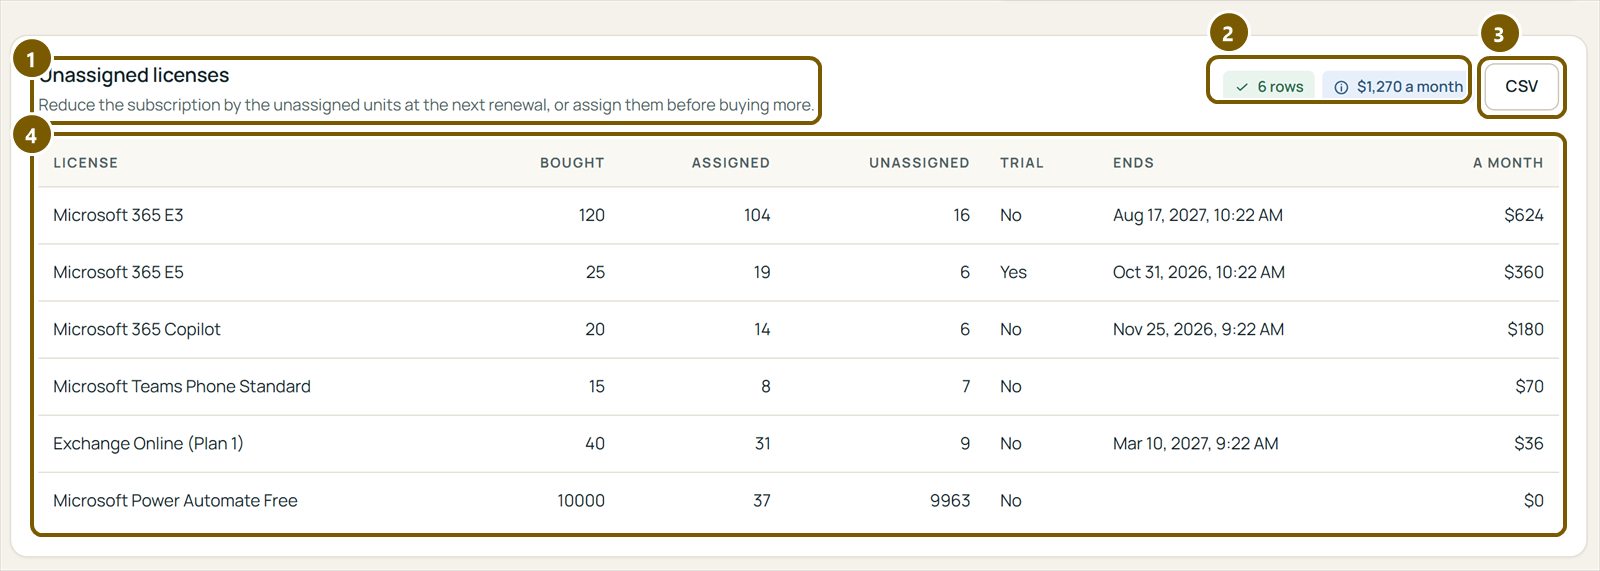
- 1The check and what to do about it, in one sentence.
- 2How many rows, and what they cost a month. Checks that have no price, such as assignment errors, show the count only.
- 3CSV downloads the whole list (section 6).
- 4The rows: the users, licenses or mailboxes behind the figure, with the facts that put each one there, most expensive first.
A user who is stale after the number of days set for the tenant (90 unless you change it, section 8) is listed under Stale users; a user who never signed in at all, created more than 30 days ago, under Users who never signed in. In the Preview each list shows its first 5 rows; the count and the cost are always complete.
The limits of the run

- 1Limits of this run says what the figures rest on: the prices used, and that a license is counted once. Every note about a check that could not run, or ran on less, is repeated here, so the block is the one place to read before you hand the report on.
The P1 note. Microsoft records last sign-in dates only in tenants with Entra ID P1 or P2. Without them, Ledger uses the Microsoft 365 usage report instead, and the stale section and the limits block say: last activity comes from the usage report; it covers Exchange, OneDrive, SharePoint and Teams to the day; sign-ins to other apps are not seen. If the usage report could not be read either, or it hides user names, the stale and never-signed-in checks cannot run, and the note says how to enable them: grant the usage-report permission at the next run, turn off "Display concealed user, group, and site names in all reports" in the Microsoft 365 admin center, or add Entra ID P1.
6. Exports and the PDF
Every check exports its whole list as a CSV file with the CSV button of its section (mark 3 of the picture in section 5). The whole report is one PDF.
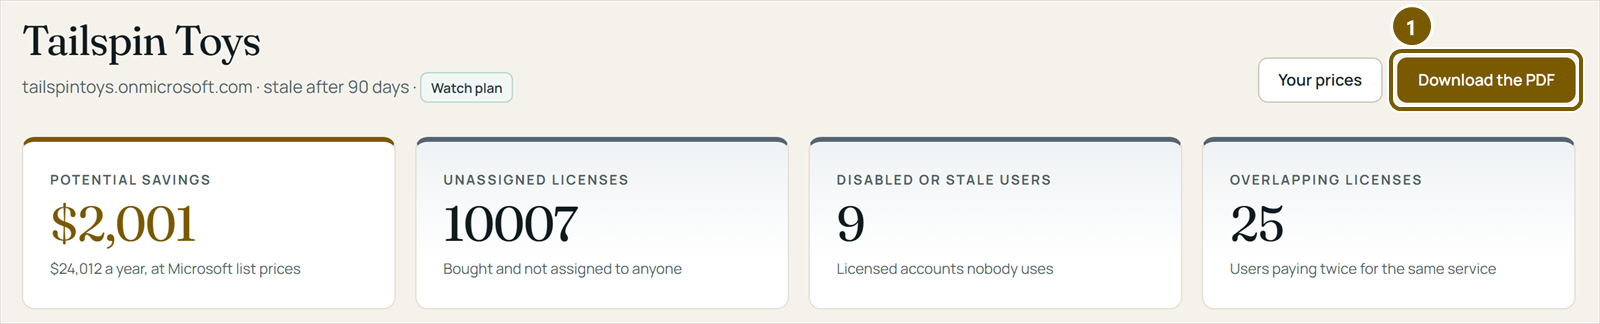
- 1Download the PDF: the report of the run shown, with the tenant's name, the date, the run's ID and the version and date of the price table, ready to hand to whoever pays for the licenses.
- A CSV holds every row of one check, with the columns the section shows. It opens in Excel or any spreadsheet.
- Exports come with a plan. In the Preview the buttons say so, and the page still shows every count and cost.
- The activity log of the workspace records that a run was exported and in which format, never the content.
7. Your own prices
Figures are priced at Microsoft's list prices in US dollars, from a price table signed by GlacierPoint. If you pay less (an enterprise agreement, a partner discount), set your own price per SKU: from then on, your price wins over the list price.
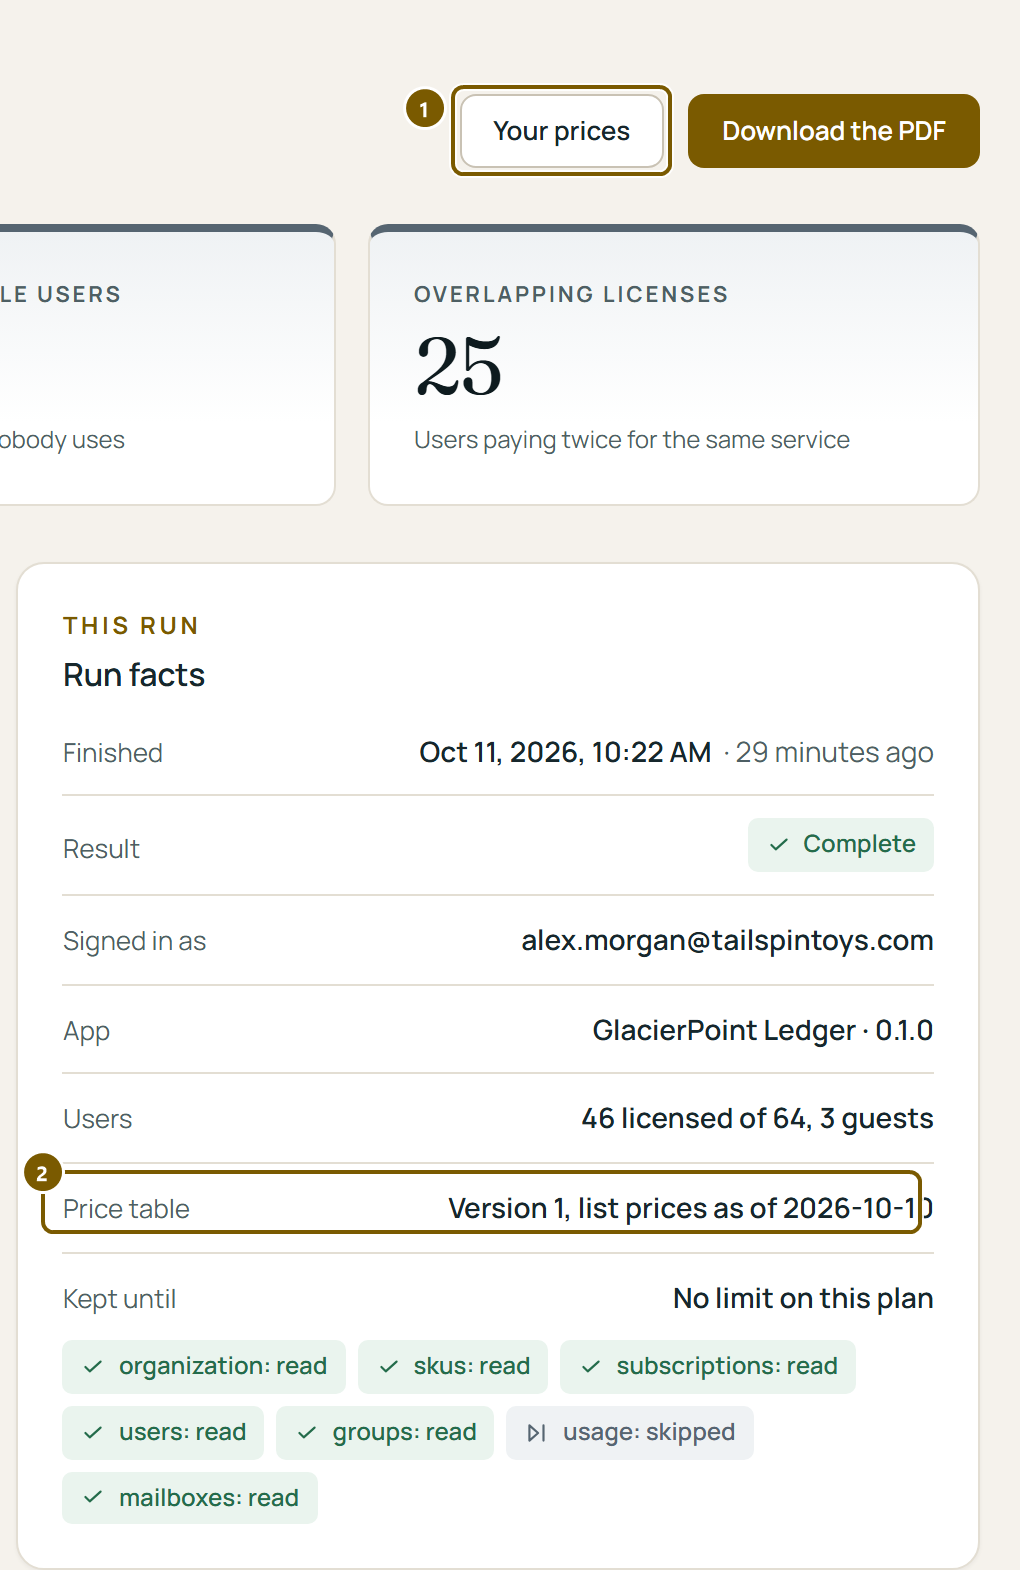
- 1Your prices opens the prices of this tenant. Settings has the same, under each tenant: Set your prices per SKU.
- 2The price table this run was priced with: its version and the date of its list prices.
The prices page lists every SKU of the table, the ones in this tenant first, with the list price a month per user and a field for your price. Type your price, or leave the field empty to use the list price, and choose Save. The next run of the tenant is priced with these figures; runs already made keep the prices they had. Owners and operators set prices; your own prices come with a plan.
8. Stale days and alerts
Each tenant has its own settings in the portal: open Settings in the portal's menu.
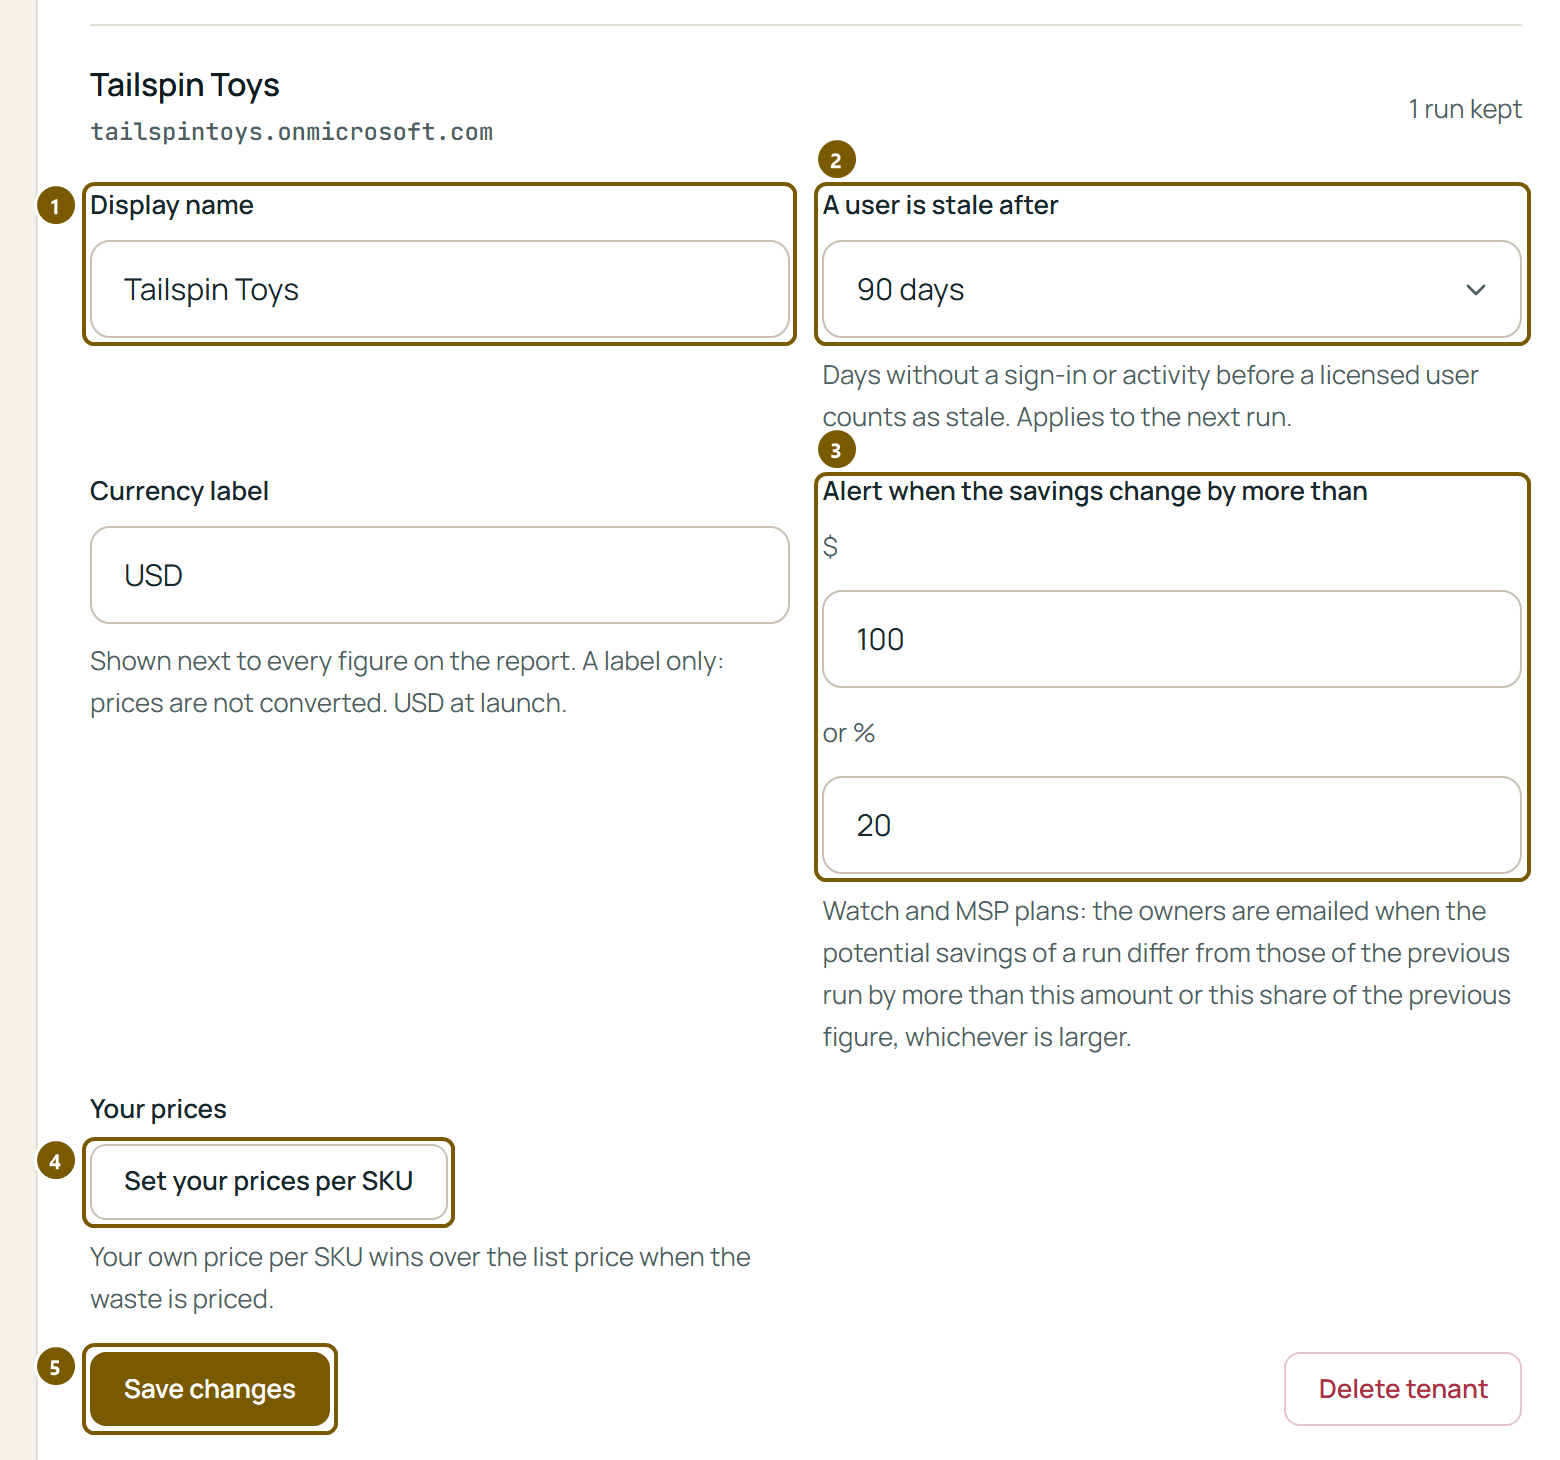
- 1The name the portal and the report show for the tenant.
- 2A user is stale after: 30, 60, 90 (the default) or 180 days without a sign-in or activity. It applies to the next run.
- 3Alert when the savings change by more than an amount or a share of the previous figure (100 dollars or 20 percent unless you change them); the larger of the two decides. With Watch and MSP, the owners are emailed when a run differs from the one before by more than that, and when a subscription is about to end.
- 4Set your prices per SKU (section 7).
- 5Save changes. Every change on this page is written to the activity log.
The same page lists the connected apps (revoke one at any time), the workspace and its members: invite a colleague by email as a viewer (reads runs and reports), an operator (also connects apps, changes tenant settings and sets prices) or an owner (also deletes tenants, revokes apps, buys plans and manages members).
9. Plans
Every workspace starts as the free Preview for one tenant. All eleven checks run in every plan; the plans differ by how long you keep the full lists, whether you can export and price with your own figures, whether runs are scheduled and watched, and how many tenants you manage.
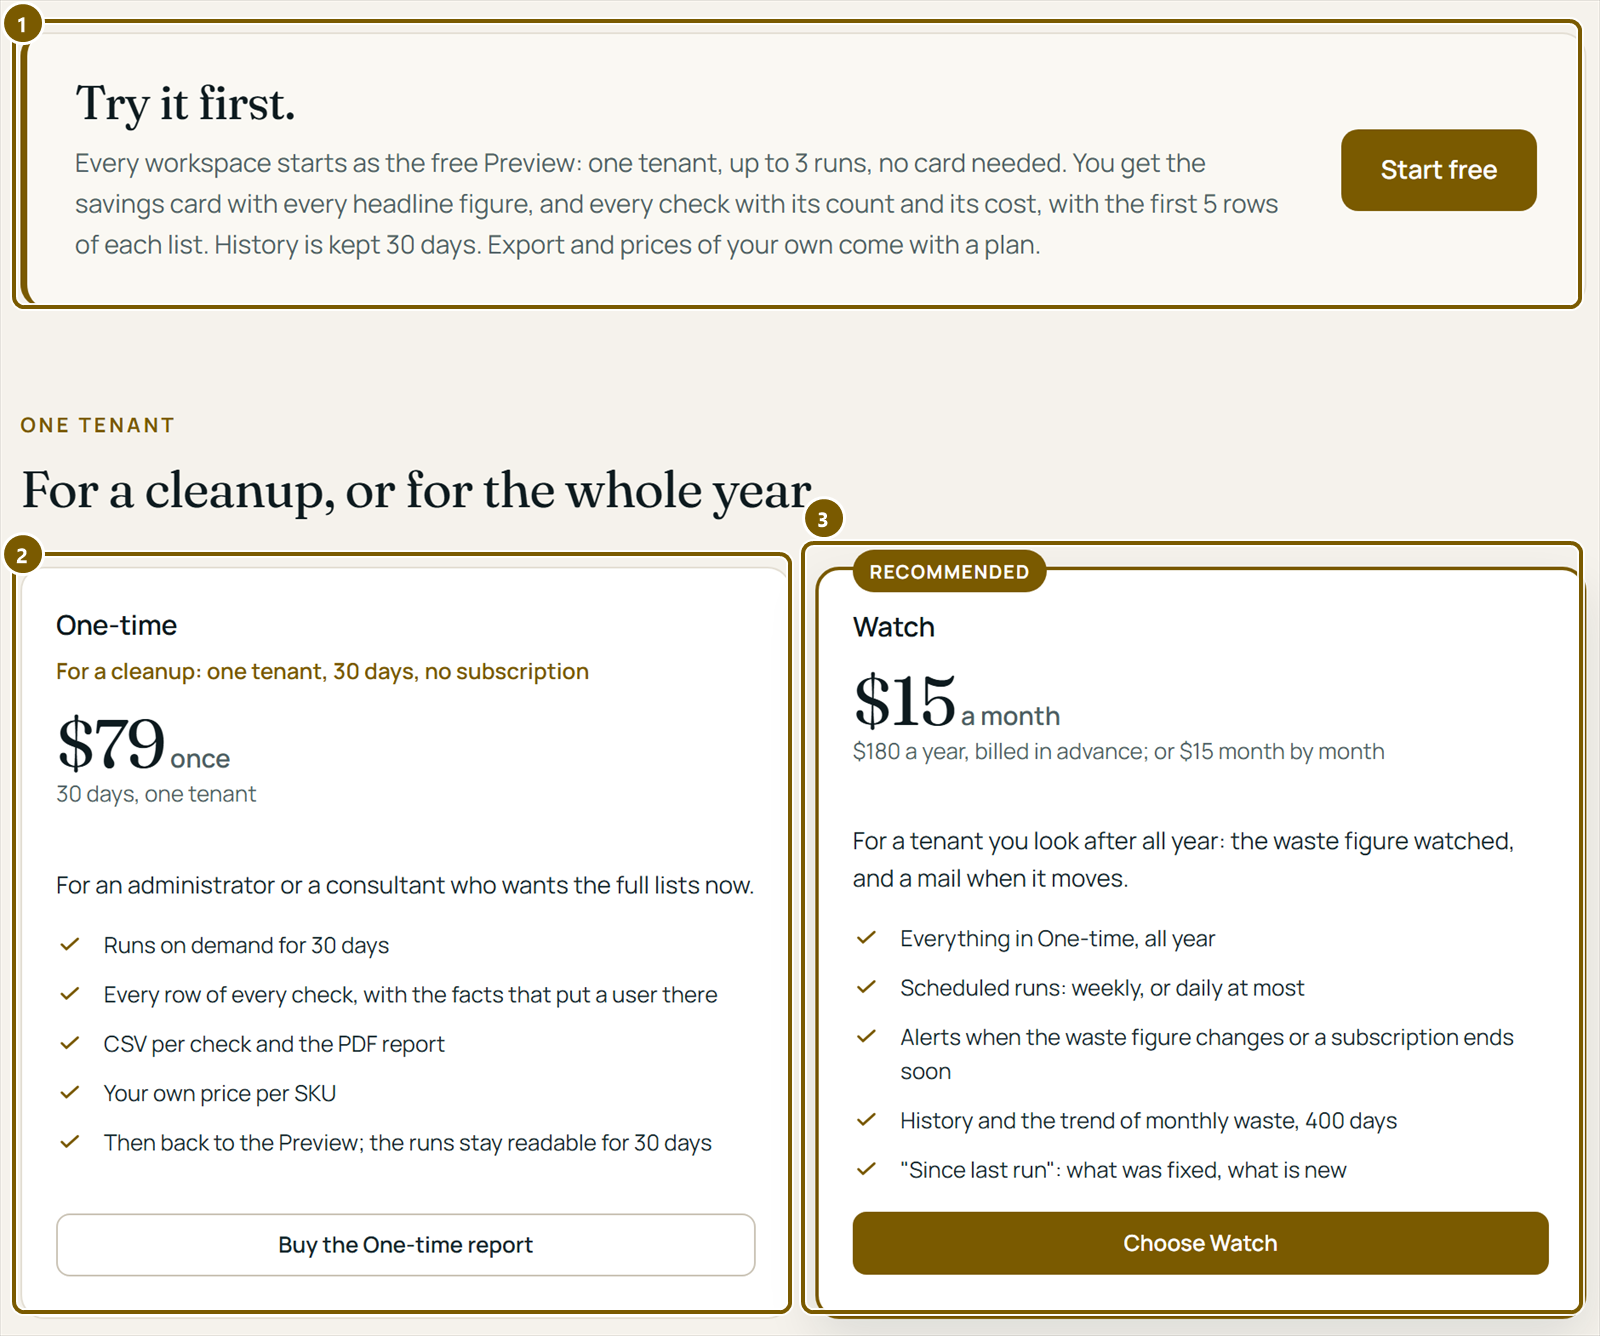
- 1Preview, free: one tenant, up to 3 runs, the savings card with every headline figure, and every check with its count and its cost, with the first 5 rows of each list. History is kept 30 days.
- 2One-time, $79 per tenant, once: runs on demand for 30 days, every row of every check, the CSV files and the PDF, your own prices. Then the tenant returns to the Preview; its runs stay readable for 30 days.
- 3Watch, $15 a month or $180 a year billed in advance: everything in One-time, all year, plus scheduled runs, alerts, and the history and trend of 400 days.
MSP, $99 a month plus $9 a month per tenant: everything in Watch for every tenant of the workspace. To buy a plan, an owner opens the portal's Settings: each tenant shows its plan and Purchase a plan. The tenant is unlocked as soon as it is paid. Prices and the full comparison are on the Pricing page.
10. Scheduled runs
With Watch and MSP, a tenant can be read on a schedule, weekly or at most daily, so that the figure is watched and the alerts of section 8 can fire without anyone pressing Run.
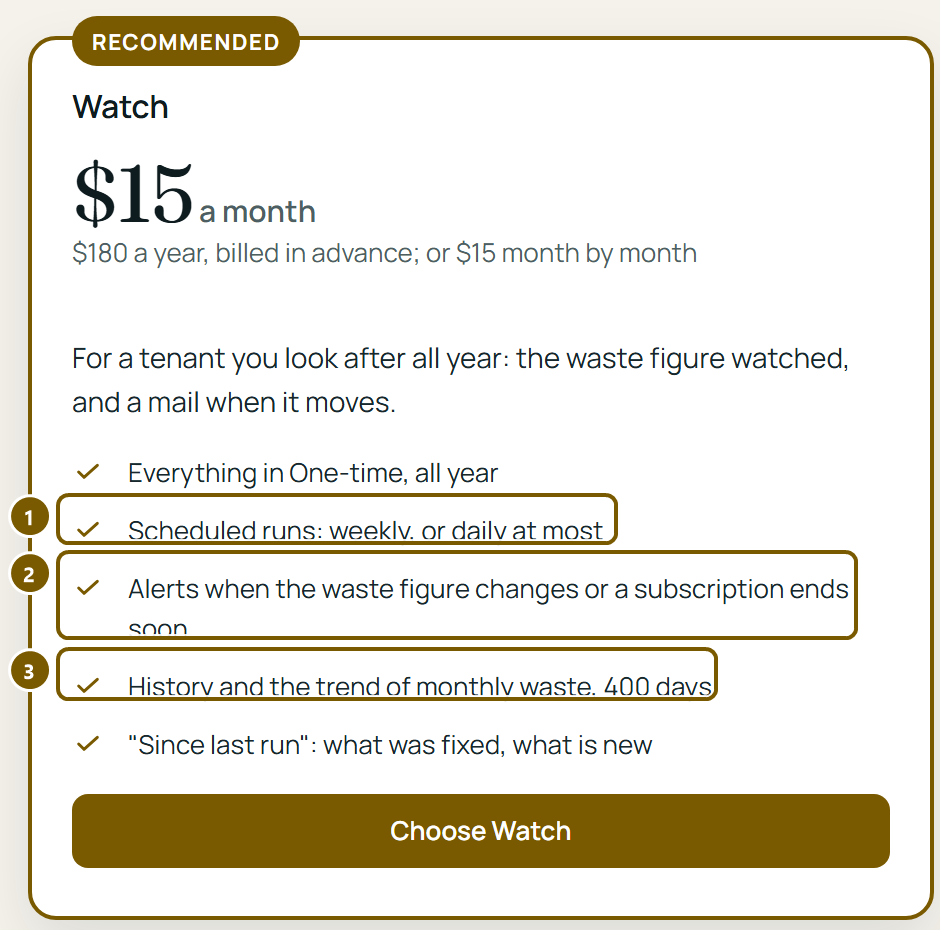
- 1Scheduled runs: weekly, or daily at most.
- 2Alerts when the waste figure changes or a subscription is about to end.
- 3The history and the trend of the monthly waste, for 400 days.
The Windows app's setup for scheduled runs is coming in this release: a scheduled run uses an app registration your organization owns and a certificate that stays on the computer that runs it. This section will show each step once it is in the app. Until then, run the audit by hand as in section 4; every run counts toward the history and the alerts of your plan.
11. Getting help
Two forms reach a person, who answers by email: Technical Support when something does not work as expected, and Feature request for something you would like the product to do. Every member can use them, on every plan, the Preview included.
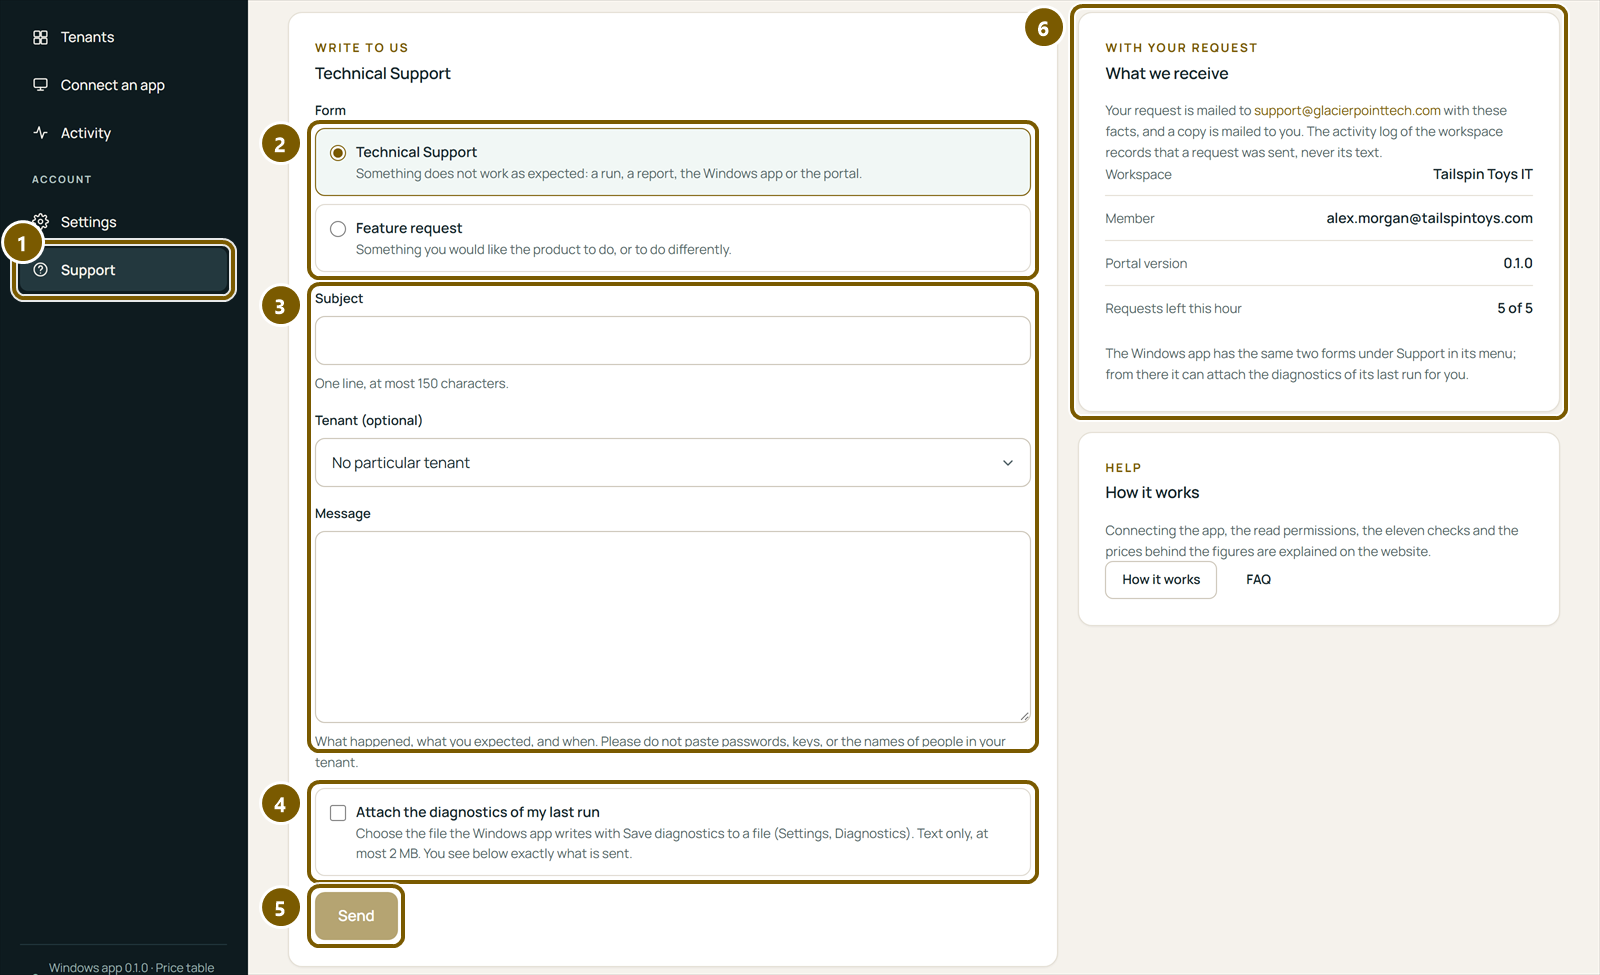
- 1Support in the Account part of the portal's menu.
- 2Choose the form.
- 3A subject (one line), the tenant if it is about one, and the message: what happened, what you expected, and when. Please do not paste passwords, keys or the names of people in your tenant.
- 4For Technical Support, attach the diagnostics file the Windows app writes. You see exactly what is sent before you send it.
- 5Send. A copy is mailed to you; the activity log records that a request was sent, never its text.
- 6What is sent with the request: the workspace, you, and the portal version.
In the Windows app, Help and support in the menu offers the same two forms and can attach the diagnostics of its last run. If neither works, write to support@glacierpointtech.com.
Not a customer yet? The Pricing page shows the plans, and the FAQ answers the common questions.